Citrus Pork Tenderloin

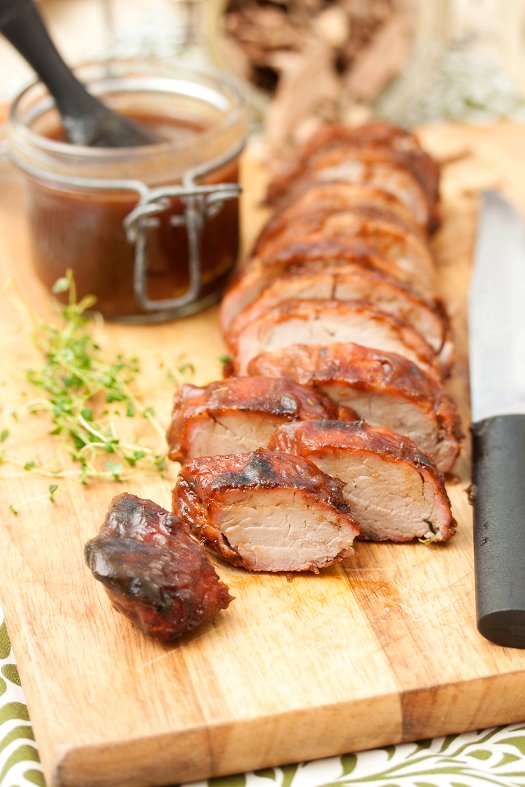
Just when I think I can’t possibly come up with another preparation for a pork tenderloin, I’ll find a new twist that I love. I’d originally made a version of this tenderloin while out on the boat this year. I’d put it together in the morning, then grilled it on the boat. The orange, lime, honey, and garlic meld together to give wonderful flavor to the pork. And the sugars in the orange juice and honey give the create a beautiful, deep carmelization. Just served it with something simple like sesame noodles or potato salad. Everyone always loved it!

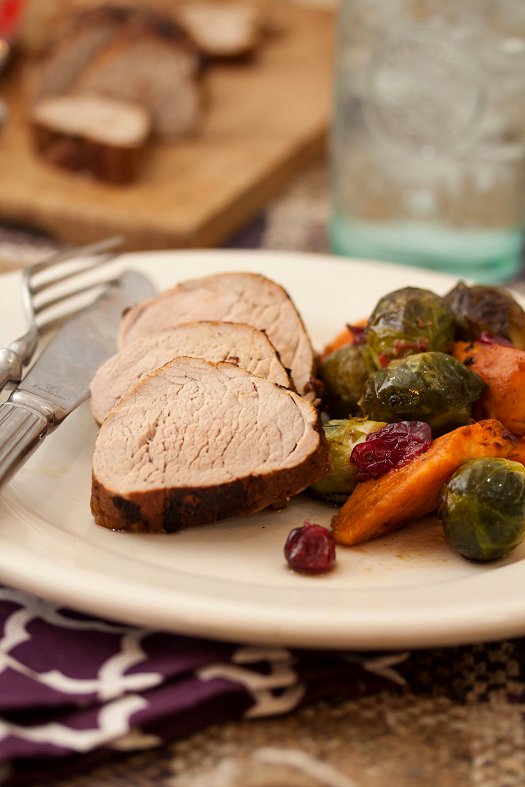
As it was such a big hit over the summer, I figured it would be something that would translate nicely to a one-dish meal, now that the weather has turned cold. So instead of grilling, I seared it off in a cast iron skillet, ten added some sweet potato wedges, Brussels sprouts, and fresh cranberries. The whole thing is placed into the oven to finish off cooking. In about 30 minutes, you’ve got a delicious (and complete!) meal.

I’d never roasted cranberries before, but now that I have – it certainly won’t be the last time! The flavor concentrates, and their sweetness really comes out. Not to mention that they were so gorgeous and festive dotted in-between the roasted veggies. For a meal that’s so easy, it’s really impressive. Something a little different than ham or crown roast of pork – also much more economical. I know I’m trying to pinch a few pennies between now and Christmas! Everyone will love this one.

caramelcorn

One of my favorite things about our local fireman’s carnival in the summertime is their homemade caramel corn. Sure, you can get great caramel corn on the boardwalk in Ocean City…but the site of a giant copper kettle full of popcorn, butter and brown sugar being continuously stirred by one of our local hard-working guys is one to behold. For me, that scent wafting through the air means summertime on Chincoteague.

But then fall arrives, and the carnival is over for another year…leaving me without a giant tub full of caramel corn to munch on. So, I decided to start taking matters into my own hands a couple years ago, and started making my own. A few basic ingredients and about an hour – and you have a giant batch of caramel corn that stays good for a couple weeks, or also make excellent gifts when bagged up and tied with a pretty ribbon.

Peanuts, are of course optional…but we love the nutty crunch that it adds. Looking forward to playing around with some different ingredients to change the flavor up a bit…maybe a little cayenne to spice things up, or a little cinnamon and nutmeg for an autumnal spin! With Halloween coming up, it’s the perfect excuse to try making this classic for yourself at home – you won’t regret it!

Homemade Caramel Corn

1 cup popcorn kernels, un-popped
1 cup (2 sticks) unsalted butter
1/2 cup light corn syrup
2 cups packed light brown sugar
1 tsp. kosher salt
1/2 tsp. baking soda
1 tsp. vanilla extract

Preheat the oven to 250° F. Line two baking sheets with a silicone baking mat or parchment paper, set aside.

Pop popcorn using your preferred method, I use and air-popper and have to do two batches. Place the popped popcorn onto the baking sheets.

Meanwhile, to make the caramel, melt the butter in a medium saucepan set over medium heat. Once the butter is melted, mix in the corn syrup, brown sugar and salt. Increase the heat to medium-high and bring the mixture to a boil, stirring frequently.

Once the mixture reaches a boil, let the mixture continue to boil for 5 more minutes without stirring. Remove the mixture from the heat, stir in the baking soda and vanilla extract. The mixture will bubble up and become frothy. Evenly drizzle the caramel sauce over the popcorn on the baking sheets, and use a silicone spatula to gently toss and coat thoroughly. It’s okay if there are some clumps of caramel throughout, it will melt and become better spread out while baking.

Bake for 40-50 minutes, removing from the oven to toss/stir every 10 minutes. After 40 minutes, test a cooled piece of popcorn. If it is not completely crispy (i.e. still slightly mushy when you bite it), bake for 10 minutes more.

Remove the baking sheets to a wire rack and allow popcorn to cool completely before breaking apart for serving or packaging. Can be stored in an airtight container for up to 2 weeks (no way in hell it’ll last that long).

Source: adapted from Annie’s Eats

Apple, Bacon, & Goat Cheese Salad

Nothing beats a really good salad in the summertime. Whether it’s a simple Greek salad with grilled chicken – or something a little fancier like this apple, bacon, and goat cheese salad…they always go over well with our family after spending a day outside in the hot summer sun!

Crispy smokey bacon, crunchy apples, tangy goat cheese, candied walnuts – and the pièce de résistance, a delicious apple butter vinaigrette. I think it may be my new favorite salad dressing!

Musselman's Apple Butter

First off, it acted as an awesome emulsifier – it truly was the perfect consistency for a dressing. It also added wonderful flavor. The sweet and spicy notes in the apple butter really worked well with the salad, and combined with apple cider vinegar – there was definitely a ton of apple flavor going on.

I think the recipe for the dressing would also be an amazing marinade for chicken or pork. Looking forward to trying that soon, will report back! In the meantime, enjoy this wonderful salad.

Disclaimer: This post is sponsored by the good folks at Musselman’s Apple Butter. As always, all thoughts and opinions are my own.


Tangy Apple Butter Pork Tenderloin

If you’ve been with us a while, you know that pork tenderloins are one of my favorite protein items. Lean, and so adaptable to any flavor combination under the sun. They’re great seared in a pan and finished off in the oven, but I think where they really shine is on the grill…and that’s something we’ve been doing alot more of now that summer is here!

The good folks at Musselman’s asked me to develop a couple of recipes for them, which I always jump at the opportunity! We’re big fans of apple butter in this house, it’s long been a favorite pantry staple of mine to use as the backbone of flavor in dishes.

Musselman's Apple Butter

This time around, I made a simple barbecue sauce using Musselman’s Apple Butter as the base. It’s the perfect consistency for brushing onto meat on the grill as is, but I doctored it up a bit – some honey and brown sugar for additional sweetness, some cider vinegar for a little tang, and some molasses for depth of flavor. A little splash of bourbon would also probably be a great addition!

I used it on pork tenderloins, but would be equally as delicious on chops or chicken. Even barbecue sandwiches! Recipe can easily be doubled or tripled to make a larger batch for a cookout. Definitely a good one to have up your sleeve this grilling season.

Disclaimer: This post is sponsored by the good people at Musselman’s Apple Butter. As always, all thoughts and opinions are my own.