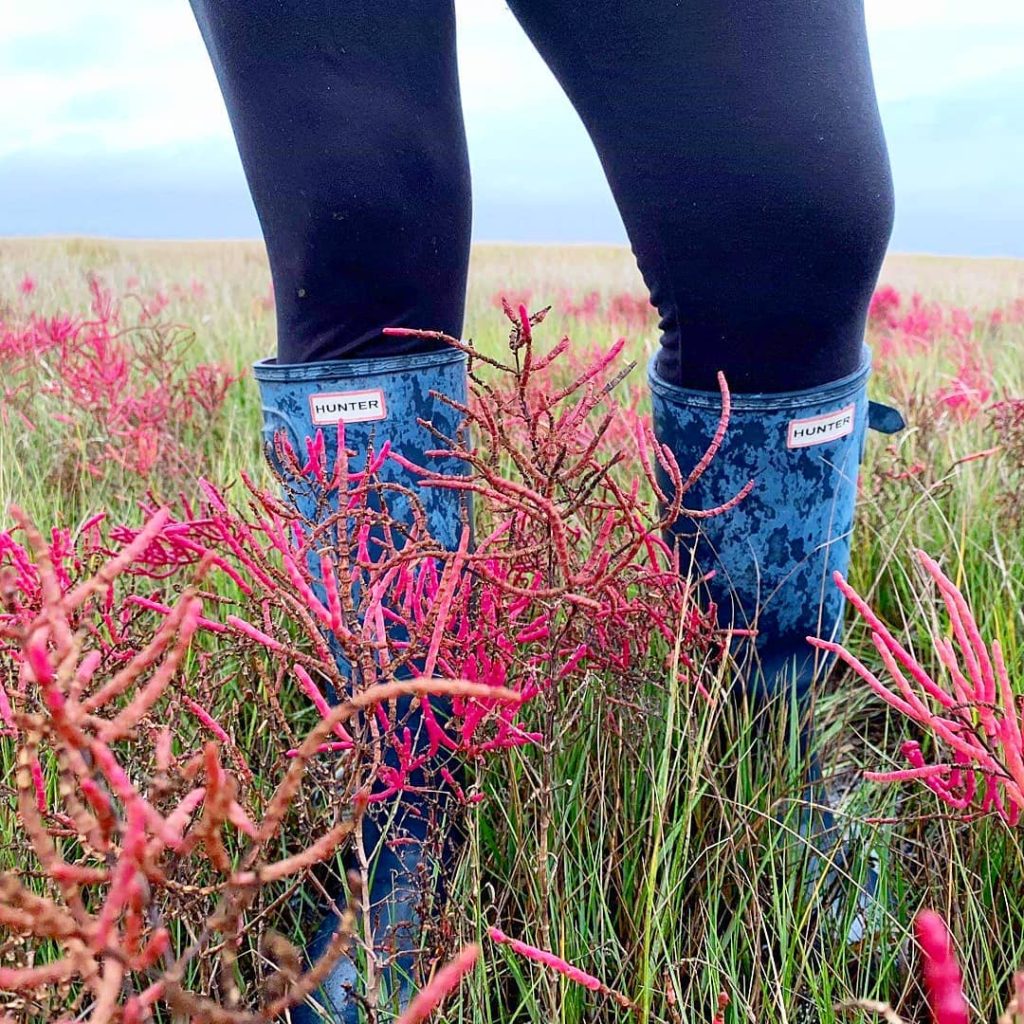
August 31, 2010
Beer Battered Fish Tacos

I consider today to be the last day of summer. Here in Maryland, there is already a crispness in the air in the mornings. School buses are on the move, and dare I say it, but I’ve already seen a few leaves changing color. It’s been a wonderful summer for me and my family. We’ve got a new baby on the way (due on Christmas Eve!), had an abundance of fresh seafood, many glorious days at the beach, and plenty of good food on the table. Even though I have not been regular with my blogging, rest assured I still have been putting out “good eats” on the regular. This, my friends, was one of our favorite dishes this summer. Beef tacos and chicken tacos are wonderful, but a good fish taco is on another plane of existence!

Now, of course you could grill or pan sear your fish for a healthier option. But, I gotta give two-thumbs up for the beer batter. I used my husbands home brewed 60 Minute IPA, and the beer flavor really shined through. The fish also stayed crispy long after frying. We were nibbling on fish nuggets long after dinner was over! I like to employ a double-shell technique for these. I had some wonderful blue corn taco shells that I got while in the “big city” a month or so ago. But, they are very fragile. My solution was to wrap a flour tortilla around the corn, and it really does give it a little something extra as far as the texture is concerned. We topped ours with a spicy chipotle ailoi, pico de gallo, and of course the traditional thinly sliced cabbage.

They’ve definitely become a favorite in our household, even with our 2 year old Drew. He couldn’t get enough of the fish, as well as the Spanish rice I served it with (which, I will have to blog on it’s own in another post…it’s insanely good as well!). I see us having this dish in the cold winter months as well for sure!

For the tacos:

1 firm white fish filet (cod, haddock, catfish, flounder)

1 1/2 cup all purpose flour

1 cup beer (whatever you’ve got laying around)

1 tsp paprika

1/2 tsp chili powder

1/2 tsp cumin

1 tsp kosher salt

6 hard corn taco shells (blue is nice, but yellow is fine too!)

6 small “fajita-sized” flour tortillas

finely shredded cabbage

pico de gallo or chopped tomato

vegetable oil for frying

For the chipotle aioli :

1/2 cup good mayonnaise

3 tbsp chopped chipotle in adobo sauce

2 tbsp chopped cilantro

1 tsp hot sauce

juice from 1/2 a lime

Combine 1 cup flour, paprika, chili powder, cumin, and salt in a medium bowl. Add the beer to the flour mixture and let it sit for at least 30 minutes to let the yeasts in the beer develop. Meanwhile prepare the fish by patting the filet dry with paper towels, then cutting into 1×1 inch chunks. Place the remainder 1/2 cup of flour into a small bowl, and toss the fish chunks in the flour to coat.

For the aioli, combine the mayonaise, chipotle pepper, cilantro, hot sauce and lime juice. Add salt to taste. Place in serving dish and set aside to let flavors mingle.

Heat 1/2 inch vegetable oil in large saucepan over medium-high heat to 375 degrees.  Remove fish from the flour bowl, and place about half of the chunks into the beer batter. Once coated in the batter well, place in hot oil, being careful not to overcrowd. Fry until golden brown, about 5 minutes. Remove to paper towel lined plate to drain. Repeat with remaining chunks of fish.

Heat corn tortillas in a 350 degree oven to crisp, and warm the flour tortillas on a plate covered with plastic wrap in the microwave for about 45 seconds until pliable. Place the corn tortilla inside the flour tortilla. Place fried fish inside the shells (I had to cut some of the chunks in half as they were large), and top with shredded cabbage, chipotle aioli, and pico de gallo. A squirt of fresh lime juice is nice as well. Enjoy with a nice cold beer!

Source: Inspired by a dish at Gordon Biersch

Posted by Laura @ 9:27 AM
August 30, 2010
Potstickers

potstickers

Who doesn’t love potstickers? I’ve always loved them. I’d always order them from the local chinese restaurant. But, they’re usually flabby and greasy. Neither of which I find to be an appealing trait. So, a few years ago I decided to try to make them at home. My first few attempts I found to be very frustrating, and more or less fruitless. I used the packaged round wontons, and they just wouldn’t cooperate for me. I ended up throwing them all away in disgust.

So, when this dish came up in cooking class last fall, I must admit that I was a bit nervous. Visions of balled up dough and bits of ground pork all over the kitchen came flooding back to me. Thankfully, these were a breeze to make. The homemade gyoza wrappers were so much easier to work with than the store-bought variety. ‘Round these parts we like pan-fried dumplings, but feel free to steam, or (Heaven forbid!) deep fry them as well.  If you think this batch will make too many for your needs, no worries. They freeze beautifully! Just quick-freeze them on a baking sheet, then place them in a Ziploc bag for storage. Good for up to 3 months. Cook as directed, but add about 7  minutes of cooking time when covered.

Pork Potstickers

2 cups all purpose flour

1/2 cup warm water

1/2 cup soy sauce

1 bunch scallions, thinly sliced

1 2-inch piece fresh ginger, peeled

3 cloves garlic, minced

3/4 lb ground pork

Stir together flour and 1/2 cup lukewarm water in a bowl until a dough forms. Knead on a lightly floured surface until just smooth, 1 to 2 minutes, then wrap tightly in plastic wrap and let stand at room temperature at least 10 minutes.

While dough stands, halve ginger, then finely chop 1 half and cut remaining half into very thin matchsticks (less than 1/8 inch thick).

Combine 5 tablespoons soy sauce with ginger matchsticks in a small bowl.

Reserve 2 tablespoons scallions to add to the ginger soy dipping sauce.  Then finely chop remainder and put in a bowl along with pork, finely chopped ginger, garlic, and remaining 3 tablespoons soy sauce. Gently knead with your hands in bowl until just combined. Chill, covered, 10 minutes.

While pork mixture chills, line a large baking sheet with paper towels and dust lightly with flour, then lightly dust a work surface with flour. Halve dough and rewrap 1 half. Pat remaining half into a flat square. Roll out dough into a 13-inch square (less than 1/8 inch thick) with a lightly floured rolling pin, dusting work surface with additional flour as needed, then cut out 12 rounds (very close together) using round cookie cutter. (If dough is sticking to cutter, lightly dip cutter in flour and shake off excess before cutting out each round.) Reserve scraps.

Transfer rounds to lined baking sheet and cover loosely with another layer of paper towels lightly dusted (on top) with flour. Roll out remaining half of dough and cut out 12 more rounds in same manner, then transfer rounds to lined baking sheet. Combine scraps of dough and wrap in plastic wrap, then let stand at least 10 minutes.

While scraps are standing, begin forming dumplings. Line another large baking sheet with paper towels and dust lightly with flour. Put 1 dough round on fingers of 1 hand near palm and put 2 slightly rounded teaspoons pork mixture in center of round. Fold round in half, enclosing filling, and pinch edges together to seal. Put dumpling on lined baking sheet and form 23 more dumplings in same manner (you may have some filling left over). Cover dumplings loosely with more paper towels. Roll out scraps into a 10-inch square (less than 1/8 inch thick) and cut out 8 more rounds. Form 8 more dumplings for a total of 32. Discard remaining scrap

Heat 3 tbsp vegetable oil in non-stick skillet over medium-high heat. Place dumplings in pan and cover, cooking for 7 minutes. Remove lid and continue cooking for an additional 3-5 minutes, until bottom of dumplings are nice and golden brown on the bottom. Remove from pan and drain on paper towel lined plate. Serve with ginger dipping sauce.
Source:  adapted from Gourmet

Posted by Laura @ 8:09 AM
March 14, 2010
Pot Roast with Stout Gravy

Allow me to introduce you to this recipe. We go way back. I first stumbled upon it when browsing The Spice House’s website (which is owned by Bill Penzey’s sister. They’re just a whole family chock full of spice tycoons, I tell ya). At the time, St. Patrick’s Day was right around the corner. I’m not a huge fan of corned beef, unless it’s in hash form. The recipe called for Guinness to be used, so I though it would be a festive alternative to the traditional corned beef and cabbage. I was right, it was a huge hit. I went out with some girlfriends that evening, and when I returned…it had all been consumed by the husband.  And make no mistakes folks, it was a large roast.

Needless to say, it since became my standard pot roast recipe. So much more flavor that your  standard Crock-Pot variety pot roast. Not only that, but I feel like it’s been improved upon by trying out different beers. I had heard wonderful things about coffee-braised pot roasts. So, I thought it would be very interesting to combine the two. Again, boy was I right!

We have  2 oh-so-wonderful local breweries in my area (hey – we don’t have much, but we’ve got good beer by God!). Both happen to make wonderful, rich dark stouts that use coffee in the brewing process. The first is Dogfish Head’s Chicory Stout. If you haven’t heard about DogFish, and like beer, do yourself a favor and try something out. You can find them nationwide, if you look hard enough. The second is Evolution Brewing Company’s Rise Up Stout.  “Evo” started  up about a year or so ago, right here on the Eastern Shore, and have been putting out wonderful craft beers. Chances are if you don’t live in the Chesapeake area, you won’t find them. But, by all means, get out there and explore the beer coolers at your local stores. Lots of great microbreweries are springing up all over the place. I’m sure you could find something near you that is equally as wonderful!

I don’t list potatoes in the recipe, but feel free to add them in with the rest of the other veggies. I usually use red potatoes that I’ve halved.  However, it’s wonderful with mashed potatoes too. You want as much of the gravy as you can get, folks. Enjoy this recipe, I promise you that you won’t miss that corned beef a bit!

Pot Roast with Stout Gravy

1 3-4 pound chuck roast

2 cups beef broth

16 oz of dark-colored stout

2 medium onions, diced

3 cloves garlic, minced

4 carrots, peeled and sliced into 2″ pieces

1 small head of cabbage, cut into wedges

2 tbsp olive oil

kosher salt

black pepper

3 tbsp cold water

2 tbsp cornstarch

Heat oven to 450 degrees. Season beef generously with salt and pepper. Heat oil in large dutch oven over medium-high heat for 2 minutes.  Place roast in pan, and sear well on both sides until nice and brown. Remove roast to plate and set aside. Add onions to the dutch oven and cook, stirring often, until the onions are starting to brown on the outsides. About 4 minutes. Add garlic and cook for an additional minute. Add the beef stock to the pan, then slide the beef into the stock. Cover, and cook for 1 hour.

Reduce oven temperature to 350. Remove the roast from the oven, add the stout, re-cover, and cook for an additional 1 hour 15 minutes.  Remove roast again, add the vegetables and re-cover. Cook for an additional 45 minutes.

To make the gravy, remove the roast (and, it will be falling apart!) and place on a platter. Then, remove the various vegetables and arrange them on the platter as well. Cover it with aluminum foil to keep warm while you make the gravy. Using a fine mesh strainer, pour the braising liquid into a medium saucepan. Combine the cornstarch and the cold water in a small dish, then add to the gravy. Cook over medium heat, stirring constantly, until the cornstarch works it’s magic and the gravy thickens.

You can try to slice the pot roast, but I just like to use two forks to pull it apart into large chunks. Whatever floats your boat, though!

Source: adapted from The Spice House

Posted by Laura @ 1:10 PM
August 9, 2009
Spicy Turkey Panini

turkeypanini

I came across these panini sandwiches while I was expecting our son Andrew. It was an instant hit with both myself, and the husband. I couldn’t believe how flavorful this sandwich was, or how easy it was to throw together. In fact, in the last week before Andrew was born, Jon took over all cooking duties for me. It might sound simple enough, but it’s actually quite a feat for him.

He cooked the usual things that men (well, most of them!) are capable of cooking…spaghetti, hot dogs, tacos. In other words, processed/ground meat central. But, he also decided to go out on a limb for himself and made these paninis. I did assist him a little in the chopping of the jalapenos. I would have been waiting all night for him to chop up 2 of them – bless his heart. My point is they are wonderfully easy. Takes 20 minutes to throw together…tops!

Spicy Southwest Turkey Paninis

1 sourdough boule or loaf, sliced in pieces 1/2″ thick

3/4 lb oven roasted deli turkey, sliced thin

2 red bell peppers, seeded and sliced into 1/4″ thick slices

1/2 lb Pepper Jack cheese, sliced (sandwich size is ideal)

1/2 cup mayonnaise

1 tbsp hot sauce

1 jalapeno pepper, seeded and finely diced

1/4 cup cilantro, chopped

1 tbsp olive oil

kosher salt and ground black pepper

Whisk mayonnaise, hot sauce, jalapeno, and cilantro in a small bowl. Set aside. In another bowl, toss red peppers with the olive oil, 1/4 tsp salt, and 1/2 tsp pepper.  Heat large non-stick grill pan over medium heat for 1 minute. Arrange peppers in a single layer in the pan, place a square of aluminum foil on top (that way you don’t kave to wash the pan you weigh down with!), then place a dutch oven, or any other heavy bottomed pan on top of the peppers to weigh them down. Cook, stirring peppers occasionally, until peppers are browned, 8 to 10 minutes. Transfer to a paper-towel lined plate and wipe out pan.

To assemble the paninis, spread mayonnaise mixture evenly on each slice of bread. Lay 2 slices of cheese onto one side of the bread. Top with turkey, red peppers, and remaining cheese. Arrange remaining bread, mayonnaise-side down, over cheese.

Heat grill pan over medium heat for 1 minute. Place 2 sandwiches in pan and weight down with Dutch oven (you can use the aluminum foil trick here as well). Cook sandwiches until golden brown and cheese is melted, 4 to 6 minutes per side. Transfer to wire rack and repeat with remaining sandwiches.

Source: Cook’s Country

Posted by Laura @ 3:37 PM
July 16, 2009
Chicken Enchiladas

chickenenchiladas

I think if my husband had to choose his favorite dish, aside from a big honking steak, it would be enchiladas. I had never had them before meeting him. My mom was a great cook, but ethnic dishes were few and far between in our house. The first time I had them, my father-in-law made them for a football game.  I took one bite of that saucey-gooeyness and realized what I had been missing my whole life. He was a fan of using pork, which, I really would like to try.  But, we always have large quantities of chicken in the freezer here…

This recipe originated from America’s Test Kitchen, but I’ve changed quite a few things over the years. It is certainly a favorite in our house, and I’m sure it will be one in yours as well. Don’t be afraid to play around with the ingredients. Sometimes I add diced green chiles, sometimes chopped black olives. Or, this time of year, when I have jalapenos overtaking the garden, I’ll throw in a couple of those that have been diced. The only limit with these is your imagination!

Chicken Enchiladas with Red Chile Sauce

1 medium onion , chopped fine
1 tsp. vegetable oil
3 medium cloves garlic , minced
3 tbsp. chili powder
3 tsp. ground cumin
2 teaspoons sugar
2 cans (8 ounces each) tomato sauce
1 cup water
1 pound boneless, skinless chicken breasts (about 2 large breasts)
8 ounces cheddar cheese, shredded
3 tbsp. pickled jalapenos, chopped
1/2 cup minced fresh cilantro
12 (6-inch) soft corn tortillas
Vegetable cooking spray
Salt
Ground black pepper

1. Adjust an oven rack to the middle position and heat the oven to 425 degrees. Combine the onion, oil, and 1/2 teaspoon salt in a large saucepan. Cover and cook over medium-low heat, stirring often, until the onions have softened, 8 to 10 minutes. Stir in the garlic, chili powder, cumin, and sugar, and cook until fragrant, about 30 seconds. Stir in the tomato sauce and water, bring to a simmer, and cook until slightly thickened, about 5 minutes.

2. Nestle the chicken into the sauce. Reduce the heat to low, cover, and cook until the chicken is no longer pink in the center, and the thickest part registers 160 degrees on an instant-read thermometer, 10 to 12 minutes. Transfer the chicken to a plate; set aside to cool. Strain the sauce through a medium-mesh strainer into a medium bowl, pressing on the onions to extract as much liquid as possible. Place onion mixture in a large bowl and set aside. Season the sauce with salt and pepper to taste.

3. Once the chicken is cool enough to handle, shred into bite-sized pieces. Add to the bowl along with the onion mixture. Add in 1/4 cup enchilada sauce, 1 cup cheddar cheese, the chopped jalapeños, and the cilantro. Toss to combine.

4. Stack the tortillas on a microwave-safe plate, cover with plastic wrap, and microwave on high until warm and pliable, 40 to 60 seconds. Spread the warm tortillas out over a clean work surface. Place 1/3 cup of the chicken mixture evenly down the center of each tortilla. Tightly roll each tortilla around the filling and lay them seam-side down in a 13 by 9-inch baking dish.

5. Lightly spray the tops of the enchiladas with vegetable oil spray. Place in the oven, uncovered, for about 7 minutes until the tortillas are starting to slightly brown on the top. (If you dont’ like a bit of crunch in your enchiladas, just skip this step completely)

6. Reduce oven temperature to 400. Remove enchiladas from oven and pour remaining sauce over to coat them thoroughly. Sprinkle the remaining 1 cup cheddar down the center of the enchiladas. Cover the baking dish with foil and bake until the enchiladas are heated through, 20 to 25 minutes.

7. Remove the foil and continue to bake until the cheese browns, about 5 minutes longer. Remove from oven and let stand for 10 minutes before serving.

Posted by Laura @ 8:46 AM
July 8, 2009
Oven Fried Pan Pizza

panpizza

Pizza made at home used to scare me. Aside from a grill, it’s hard to get a hot enough temperature in your oven to get a decent, crispy crust. After a few attempts, I lost all hope and gave up. A few months later I saw an episode of The Cooking Loft with Alex Guarnaschelli. She was executing a technique for pizza that I had never thought of. Frying the dough in a cast iron skillet before topping it. Then, finishing off the baking in an oven. Genius!

This pizza is great. So great in fact, we rarely order it out anymore (not that we have a slew of great pizza shops around here anyway). This recipe makes 2 12-inch pizzas.Top it with whatever you like. Unlike many pizza crusts, this one can take a beating. So, pile the toppings on. She can handle it, I promise!

Pan Pizza:

Basic Pizza Dough, recipe follows
8 tablespoons olive oil
1 1/2 cups pizza sauce (make your own or use jarred)
8 oz whole milk mozzarella cheese, shredded
Additional toppings (I used pepperoni, olives, peppers, and red onion)

Preheat oven to 450 degrees F.
In a 12 inch round cast iron skillet, heat about 2 tablespoons of the olive oil over medium-high heat. Use a spatula to press gently on the top of the round to keep it relatively flat as it cooks. When you see it is slightly brown on the underside, season the top lightly with salt and flip. Remove from heat. Season the other side with salt.  Spread about 3/4 cup sauce evenly over the dough. Sprinkle with half of the mozzarella. Then, top with whatever toppings you like. Place in pre-heated oven for about 10 minutes or so, until cheese is nice and melty.

Repeat with remaining dough and topping.

Basic Pizza Dough:

1 package dry active dry yeast
1 1/2 cups warm water (about 110 degrees F)
3 1/2 cups all-purpose flour, plus additional for rolling dough
2 teaspoons kosher salt
1/2 teaspoon ground white pepper
1 tablespoon honey
1 tablespoon olive oil, plus some additional for coating the bowl

In a large bowl, combine the yeast and warm water. Stir to dissolve the yeast and allow the mixture to rest for 5 minutes.

Using a sieve or strainer, “sift” about half of the flour over the yeast mixture and blend until smooth with your hands. Add the salt, pepper and honey and mix to blend. Sift in the remaining flour and mix to blend.

Lightly flour a cutting board or flat surface. Turn the pizza dough onto the floured area and knead for 3 to 5 minutes. The flour should feel smooth and the ingredients fully integrated. Place the dough inside a lightly oiled large bowl. Cover with plastic wrap and let rest in a warm place, about 1 1/2 hours or until doubled in volume.

Press gently on the dough and turn it onto a floured surface. Divide the dough into 2 equal parts, rolling each half into a loose ball. Cover with a clean kitchen towel and allow the dough to rest for an additional 15 minutes. Flatten each ball, and roll into a 12 inch round. Place each round in a single layer on a lightly greased baking sheet.

Adapted from: Alex Guarnaschelli

Posted by Laura @ 10:09 AM